The Secrets of Effective Fill Flash Techniques
(by Les Voorhis)
 Like
many photographers I spent years looking for ways to improve my
photographs. What was it that made the photos I saw in magazines
and calendars so much better than the images I was making. How
were other photographers able to control the lighting of their
subject so effectively? How can they keep detail in the highlights
and in the shadows?
Like
many photographers I spent years looking for ways to improve my
photographs. What was it that made the photos I saw in magazines
and calendars so much better than the images I was making. How
were other photographers able to control the lighting of their
subject so effectively? How can they keep detail in the highlights
and in the shadows?
As time went by and my skills improved, some things became obvious.
The photographers that I admired used many different techniques
to make their photographs stand out from the rest. Their primary
strength was the time of day that their images were taken. Most
of the stronger images were taken in what photographers call the
"sweet hours" surrounding daybreak and dusk. It is during
this time of the day that the light is of such a quality that
allows images to carry a wide range of tones and still show detail
in shadowed areas as well as the highlight areas. In contrast
were images that were not taken at the "best" time of
day or in the "best" conditions, but the photographers
were able to balance the ambient light to give the image a more
pleasing tonal range. This was accomplished with a variety of
methods, but primarily with the use of fill-flash.
At first, fill-flash seemed a little intimidating. Part of this
is due to the fact that it is impossible to see the results of
the flash until the film has been processed. This, combined with
the difficulty of calculating the correct flash exposure, had
kept fill-flash out of my reach for many years. With the advent
of newer electronic cameras and Through-the-Lens (TTL) flash exposure,
fill flash has been greatly simplified and is now within the grasp
of every photographer. Those willing to do a little experimenting
and learn to "pre-see" how the flash will illuminate
a given subject can greatly increase the control over their images.
Most hot-shoe mounted flash units emit a light roughly daylight
balanced or close to 5500 Kelvin. This is necessary to make them
compatible with the majority of daylight balanced films that nature
photographers use. Also the light generated by this type of flash
unit is of a very short duration. A typical burst lasts 1/1,000
of a second or shorter. Some of the higher powered and more expensive
units can burst as quickly as 1/10,000 or even faster. These quick
bursts can be used very effectively to freeze movement, such as
a hummingbird's wings.
Camera bodies also play a large role in using fill-flash. Cameras
are designed to "synch" with the flash at a particular
shutter speed. These speeds can range from 1/60 of a sec. up to
a 1/250. Any shutter speed slower than this can be used but you
are unable to select anything faster. If we need to use the flash
in bright or sunny conditions we may have to stop the lens down
a smaller aperture to accommodate the slower shutter speeds. In
order to control the amount of Depth of Field and depending on
the subject matter, a smaller aperture may not be a viable alternative.
We need to figure out ways to overcome these shortcomings. One
alternative is to chose a camera body such as Canon's EOS 3 which
when used with a Canon EX series Speedlight you are able to synch
your flash at any shutter speed. Another is to chose a slower
speed film or use a neutral density or polarizing filter over
the lens in order to reduce your effective aperture.
One of the drawbacks to using a flash in the field is the output
strength of the unit itself. The light has a tendency to fall
off very quickly and is unable to span long distances. This is
not a problem for objects that can be photographed close-up such
as flowers or insects, but can be almost useless for large mammals
photographed at distances of 50 - 100 feet or more. The camera's
built in flash typically becomes useless at distances beyond 10
feet so a hot-shoe mounted unit becomes the necessary choice.
A flash extender or Fresnel lens can also be used to increase
this working distance by concentrating the light beam and focusing
it in a much smaller area. These add-ons normally will increase
the flash out put by two to three f/stops. This type of extender
typically must be used with lenses of 300mm in length and longer.
Shorter lenses will cover a larger area than the flash does and
you end up with a portion of your image being spotlit.
Until recently, the main disadvantage to using fill-flash, especially
on mobile subjects, was the difficulty in determining the flash
exposure. Since the flash to subject distance determines the exposure,
using it on anything other than stationary objects was very difficult.
With todays newer TTL cameras, a lot of that exposure determination
is done for us. However, if your camera and flash unit don't allow
for TTL exposure, these same automatic principles apply to any
flash unit that has a thyristor or some sort of built in automatic
meter.
Fill flash is used whenever we want to fill in shadowed areas
of our photographs or whenever we want to balance the tonal range
of the image to within a range that the film can record. Lets
look first at using flash in bright sunlit conditions.
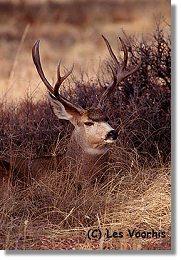
We are photographing a nice mule deer buck that we have been
working with from first light. Three hours later the buck has
now laid down in the shade to escape the hot sun. With fill flash
we can balance the light falling on the buck in the shade with
the background that is lit by the bright sun.
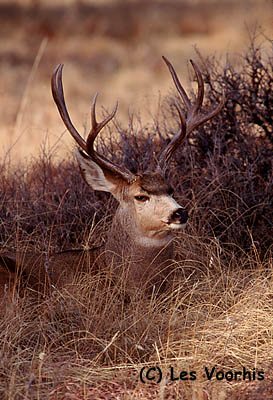 In
this type of situation I typically begin by metering the light
falling on the background. I set my camera body to its fastest
flash sync speed of 1/250th sec. Metering the background gave
me a reading of 1/250 @ f/11 with 100-speed film. I want to open
one stop from that reading in order to keep the background looking
light and natural. I now have an exposure of 1/250 @ f/8. Using
my TTL flash I set the exposure compensation dial to -1/3. I have
found that "dialing the flash down" in this manner,
helps to avoid the "overflashed" in my images. This
is also a great example of how a faster synch speed can be beneficial.
If my camera were to synch at 1/60, my exposure would be 1/60
@ f16, possibly providing more depth of field than I desired in
this situation.
In
this type of situation I typically begin by metering the light
falling on the background. I set my camera body to its fastest
flash sync speed of 1/250th sec. Metering the background gave
me a reading of 1/250 @ f/11 with 100-speed film. I want to open
one stop from that reading in order to keep the background looking
light and natural. I now have an exposure of 1/250 @ f/8. Using
my TTL flash I set the exposure compensation dial to -1/3. I have
found that "dialing the flash down" in this manner,
helps to avoid the "overflashed" in my images. This
is also a great example of how a faster synch speed can be beneficial.
If my camera were to synch at 1/60, my exposure would be 1/60
@ f16, possibly providing more depth of field than I desired in
this situation.
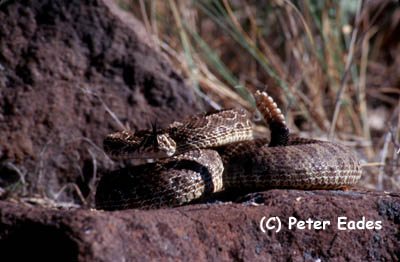
Another excellent time to reap the benefits of fill flash is
when your subject is in very bright, direct overhead light. This
type of light creates a lot of contrast between the highlights
and the shadows. We can use our flash to add detail to those shadowed
areas and more effectively balance our exposure. Since our main
light source is the sun our exposure calculations become easier
than our previous scenario. Setting the camera to its fastest
synch speed (1/250) and using a 50-speed film our exposure is
measured at 1/250 @ f/8. The only thing left to do at this point
is to set the amount of "fill-in" we want from our flash.
My experience has been that adjusting the flash -2/3 to -1 stops
down gives the most pleasing results. You don't want the flash
to be your main source of light, you just want to bring some light
and detail to those heavily shadowed areas. Much more detail has
been gained in the shadowed areas of the snake, opposed to the
image where fill flash was not used.
 Using
flash in overcast light can help to bring extra sparkle to your
images as well as add a little more depth. Be very careful not
to overpower the softer ambient light, as all we want is to add
a little spark to the image. Since overcast light can sometimes
carry a blue or "cool" tone our flash unit that is daylight
balanced can actually warm the image a little. You could even
add a slight warming filter to the flash head to warm it up even
more. Theatrical supply companies that sell lighting supplies
can be a great source for flash filters. (TIP: their old sample
packs can even have the exact size gels to fit your flash head
and they sometimes give these away free.)
Using
flash in overcast light can help to bring extra sparkle to your
images as well as add a little more depth. Be very careful not
to overpower the softer ambient light, as all we want is to add
a little spark to the image. Since overcast light can sometimes
carry a blue or "cool" tone our flash unit that is daylight
balanced can actually warm the image a little. You could even
add a slight warming filter to the flash head to warm it up even
more. Theatrical supply companies that sell lighting supplies
can be a great source for flash filters. (TIP: their old sample
packs can even have the exact size gels to fit your flash head
and they sometimes give these away free.)
In this type of light, your shutter speed is much slower than
in the bright sun and it is important to ensure that it is fast
enough to stop your subject's movement. Although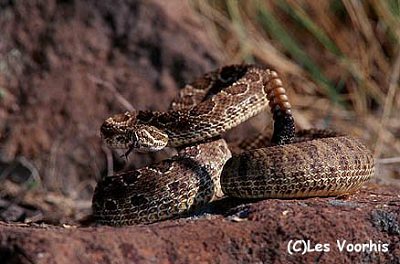 the flash can freeze motion, it is not used as a main light and
if you are not careful you can end up with a ghost image. One
exposure comes from the ambient light and can be blurred and a
second more faint but sharper image can come from the lower output
flash. While this can be a creative technique, ensure that this
effect is what you are after.
the flash can freeze motion, it is not used as a main light and
if you are not careful you can end up with a ghost image. One
exposure comes from the ambient light and can be blurred and a
second more faint but sharper image can come from the lower output
flash. While this can be a creative technique, ensure that this
effect is what you are after.
In the image of the mallard drake, the light is low and a 1/30-sec.
exposure @ f/5.6 was required. In low light such as this a direct
on camera flash can also create eye shine. This is the same phenomenon
as "red eye" in humans and can only be eliminated by
moving the flash off of the same axis as the lens. You must use
an off camera synch cord and a bracket. Or you can achieve the
same results by holding the flash off to one side by hand.
I set the flash -1 1/3 below the ambient exposure using the flash
compensation so as not to overpower the image. I will typically
use a much lower amount of fill (more negative compensation) in
overcast situations to avoid overdriving the ambient light. 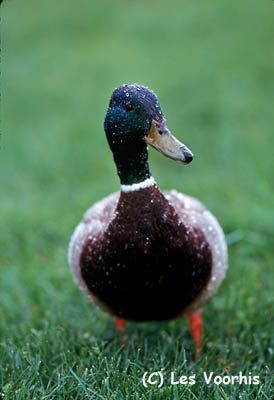 In
this case it was just enough to add a little highlight to the
water drops on his head and neck and to give him a catch-light
in his eye. I also moved the flash approx. 12 inches off camera
by order to avoid the possibility of eye shine. My experience
has been that any image made in light measuring lower than 1/250
@ f/2.8 (or equivalent exposure) has the possibility for eye shine
so I try to move the flash off the lens axis whenever possible.
How far you move the flash will be determined by how close you
are to you subject as well as how your subject's eyes are positioned
on their head. For example, mountain lions eyes located on the
front of their head will reflect differently than a deer's eyes
whose eyes are located on the side.
In
this case it was just enough to add a little highlight to the
water drops on his head and neck and to give him a catch-light
in his eye. I also moved the flash approx. 12 inches off camera
by order to avoid the possibility of eye shine. My experience
has been that any image made in light measuring lower than 1/250
@ f/2.8 (or equivalent exposure) has the possibility for eye shine
so I try to move the flash off the lens axis whenever possible.
How far you move the flash will be determined by how close you
are to you subject as well as how your subject's eyes are positioned
on their head. For example, mountain lions eyes located on the
front of their head will reflect differently than a deer's eyes
whose eyes are located on the side.
Practice, practice, practice! Experimenting is the best way to
determine which flash settings you prefer and how your particular
setup reacts to each situation. Subjects both lighter and darker
than neutral can also fool the cameras TTL metering system so
bracket your exposures if you can to ensure the best results.
If you feel somewhat overwhelmed by all of this, you are not alone.
Break each of these steps down into pieces and remember the basics
of exposure and light and you can quickly turn your more mundane
images into real showstoppers.
All text and images are copyright Les Voorhis (except where
otherwise noted).
About the Author: Les is a
professional nature/wildlife photographer based in Lakewood, CO.
An avid outdoorsman, Les has photographed our nation's back roads
extensively with heavy concentration in the Rocky Mountain west.
He often heads off the beaten path to areas rarely traveled by
others. His affinity for all things wild and unspoiled has allowed
him to find and capture magnificent images on film. From the wilds
of Alaska to the busy roadways of Rocky Mountain National Park,
he has successfully photographed some of the United States' most
prolific and sometimes elusive wildlife. Elk, Mule Deer, Bald
Eagles, and Mountain Goats are favorite subjects. In the silence
of the predawn hours, he forms a magical unspoken bond with his
subject. That magic is then transferred to film. His exceptional
eye for dramatic light is apparent from his majestic mountain
scenes to his delicately detailed macro work. Les offers photography
seminars in the Denver area. He is actively shooting to add to
his extensive stock photography file. Les' images can be seen
regularly in national and regional publications including Rocky
Mountain Game and Fish and Colorado Outdoors, Bugle Magazine and
American Hunter. A selection of his fine art prints is currently
being showcased in Colorado galleries and gift shops.
You can see more of Les's work at the following
websites:
Profotos
- Les Voorhis
Voorhisphoto.com