The Zone System - Part Two
Exposure
(by Lars Kjellberg)
In Part 1 we looked at some of the basic principles of the zone
system that you should be familiar with if you are going to understand
its ideas fully. In Part 2 we are going to look at a few more
of the basic principles before we go on to apply them in practice.
The exposure meter always assumes it is pointed at a "normal"
gray surface, even if the surface in reality is black or white.
An exposure meter cannot tell what it is being aimed at. Is it
aimed at a light or a dark surface? An illuminated dark surface
will give you the same reading as a light surface in a dark room.
Whether the surface that the light meter is measuring is dark
or light (in other words, is reflecting a little or a lot of light),
is something that the meter cannot determine. It is only able
to measure how much light is reflected from the surface; it can
give us an exposure reading for the surface.
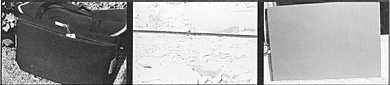
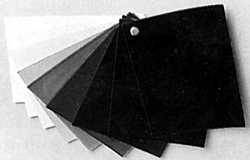
By exposing the back camera-bag two stops less than the measured
value, it came out properly black. The white surface in the middle
comes out properly white when exposed 2 1/2 stops more than the
measured value.
Always grey
This brings us to something very important; the light meter always
assumes that the measured surface is supposed to be grey. The
exposure reading the meter produces is geared towards rendering
the object's tone as medium grey.
Exercise: Load your camera with black and white film,
and go out and take photographs of objects that have entire surfaces
that are monotone. Vary between white, black and grey surfaces.
Coloured surfaces can also be used. Measure the exposure with
the camera's meter or a hand held meter. Expose all the surfaces
exactly as the meter suggests. The camera's automatic exposure
can be used with great advantage. Develop as usual, and print
the photographs using the same exposure time and a normal paper.
Every finished picture will have the same tone.
Deliberately controlling tone
Once we have grasped that using the settings suggested by the
exposure meter means that our photographs will have a medium grey
tone, we can start to think about how to change the overall tone
of the picture. This is done by choosing a setting different from
the one suggested by the meter for the shutter speed and/or the
aperture. If the meter tells us to use f8 and 1/125 seconds, we
can, by choosing f8 and 1/500 seconds, achieve a tone that is
two stops darker. 1/500 seconds is two exposure stops shorter
than 1/125 seconds, the film will be two stops less exposed, and
therefore the picture two stops darker. You can also make the
picture lighter by choosing a longer shutter speed or a wider
aperture.
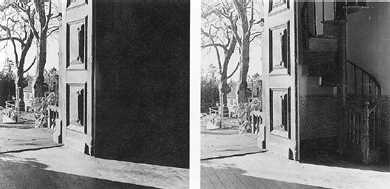
The chapel of the Atlantic island Madeira, didn't have any windows.
The contrast was extremely high. The left picture was exposed
using an average measuring method. The result is a negative with
no details at all behind the door.
In the right picture exposure was calculated after measuring
the darkest parts with a spot-meter, ensuring negative details
in the shadows. The over-all contrast was reduced with less development
of the film. Once we know how to control the picture's tone, we
can photograph any object of any tone and get it right at the
first attempt. We simply choose a setting for the exposure that
will give us the correct tone.
Exercise: Load the camera with black and white film, and
go out and take more pictures of surfaces, only this time practice
altering the exposure. For example, when you shoot a dark surface
the exposure can be reduced two stops. Light areas demand an increase
in exposure, so try increasing two or three stops. Grey areas
should be exposed according to the meter's suggestions. Develop
as normal, and print all negatives on a normal paper with the
same exposure for all the negatives. Choose an exposure where
the grey surfaces come out grey, and the other surfaces will then
automatically come out right.
Making a comprehensive exposure scale
The next problem is that we do not know how much lighter or darker
the image will be when we change the exposure by a certain number
of stops. We are therefore going to create a test series of exposures
to establish the picture tone.
Exercise: Place a grey card outdoors so that it is evenly
lit. Point the camera, loaded with black and white film, at the
grey card without shadowing it. Focus on infinity. Measure the
grey card's exposure with the camera's meter or a hand held meter.
Start by decreasing the exposure by four stops: thus, if the meter
reads f8 and 1/125 seconds, set the camera to f11 and 1/1000 seconds.
Take the first picture. Increase the exposure one stop (to f8
and 1/1000 seconds) and take the second picture. Continue until
you have taken nine pictures, which will mean that you have a
picture for every setting from minus four stops to plus four stops.
Develop the film as usual, and print all nine negatives using
the same exposure and a normal paper. If they have been correctly
printed, you will have a scale ranging from totally black to totally
white with seven stops of grey in between.
Using this grey scale to help, it becomes much easier to choose
an exposure regardless of what you are photographing. It is makes
no difference if you are photographing a black, white or grey
surface; with an exposure meter and the help of your grey scale
you can give the photographed surface any grey tone you wish.
All you have to do is adjust the exposure in the appropriate direction.
Increased exposure (wider apertures or longer shutter speeds)
provides tones that are lighter than medium grey. Decreased exposure
(smaller apertures or faster shutter speeds) provides tones that
are darker than medium grey.
Underexposure
By decreasing the exposure by 3.5 stops, you reach the limits
of underexposure. By decreasing the exposure by more than 3.5
stops from the measured value, the negative will be blank and
the picture will print as totally black. This limit has to be
watched out for. It is best to make sure than none of the object's
detail ends up beneath this limit.

The threshold for under-exposure is situated 3 1/2 stops left
of (under) the measuring point for the exposure meter (the arrow).
Knowing this will make it easier to expose black and white film
correctly. Confronted with an object to photograph, you start
by identifying the darkest and measuring the exposure there, and
you then adjust the exposure to ensure that this area ends up
slightly above the underexposure limit. The exposure the meter
will suggest will give this a medium grey tone, but we do not
want the darkest part of the object medium grey; we want it to
be black. Thus we have to decrease the exposure. The grey scale
will help us decide by how much we need to decrease the exposure.
Two stops may be sufficient. If the exposure meter gives a reading
of f4 and 1/30 seconds, we should set the camera to f5.6 and 1/60
seconds. This will make sure that the darkest part of the object
will appear on the negative. Set your exposure according to the
shadows.
Ansel Adam's exposure zones
Ansel Adams chose Roman numerals for the exposure stops, which
he called zones (exposure zones). He probably did this to give
the different exposures separate names rather than talk about
minus one stop or plus two stops. In Adam's terminology, the 'normal'
exposure is called Zone V. A Zone V exposure is the exposure you
get if you use the reading the meter provides, without changing
it. If you decrease exposure one stop you get a Zone IV exposure.
If exposure is increased three stops, you get a Zone VIII exposure.
In other words, the numbering system starts from the normal Zone
V exposure and then adds or deducts one for each of the stops
by which the exposure is increased or decreased.
Zone 0, which is so underexposed that the negative will come
out blank, is five stops beneath the normal exposure. Zone I is
also under the underexposure limit: it may give you some detail
in the negative, but it is still essentially useless to print
from. To be able to distinguish detail from the wholly black in
the finished photograph, it has to be exposed at least in Zone
I 1/2 and preferably in Zone II. Detail exposed in Zone III will
be very distinct in the finished print.
Brighter details need to be exposed using the higher zones. Zone
IX will be totally white when printed. Zone VIII will be almost
white. Details that are supposed to appear white should be exposed
somewhere within Zones VIII to VIII 1/2.
The zone scale
The grey scale described earlier can also be called a zone scale,
which is arrived at by numbering the greys with Roman numerals
from I to IX. The scale is used to help us see what the different
zones (and their exposures) will look like in the finished photographs.
The advantage of the zone system
Getting the exposure right is probably the most important part
of the zone system. When you have learnt how to determine the
correct exposure using to the zone system, you no longer risk
ending up with underexposed negatives. You can photograph the
most difficult objects without losing fine detail, and a correctly
exposed negative is the most important prerequisite for photographs
that are rich in tone. It is not a disaster if the contrast is
not spot on - that can always be adjusted in the printing - but
an underexposed negative will never give you a good picture. If
you choose too fast a shutter speed or too small an aperture,
inevitably important detail will be lost that cannot be retrieved
in the dark room.
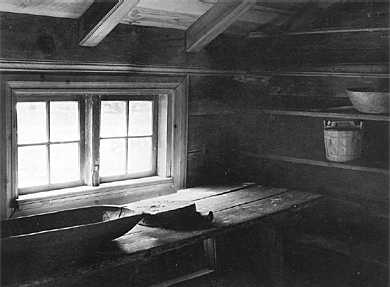
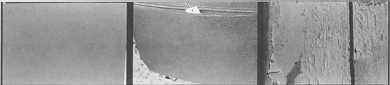
An "impossible" object in the eyes of many average
photographers. The only light source is the small window. It is
very dark in the corner. I measured the reflected ligth at the
darkest places in the corner with my Pentax digital spot-meter.
I then calculated an exposure that garanteed me to have details
in the darkest parts. The negative was developed less than normal
in order not to get the high-lights to black on the negative.
Film: Kodak T-Max 400 9 x 12 cm. Exposure: f 22 and 13 seconds.
Error processing SSI file
You can see more articles and information
by Lars Kjellberg on the Photodo.com website - a great resource
for photographers around the world!