-A Lens
With a View: Part 1-
by Robert A F
van de Voort
This and the following articles will introduce the view camera
to the reader who is completely unaware of the possibilites, the
surprises and ease of use of the big black box, my favourite working
tool.
Most of us are very familiar with 35 mm cameras, medium format
cameras that use 120 size film and digital cameras.
However, there is another camera, which has been used for over
a hundred fifty years and making a come back, so we might as well
get used to it. Most of us have seen the thing, big, unwieldy,
complicated, ugly and no bells and whistles but awesome in its
image making......
Because the shape is so unfamiliar we do not know where to begin
to take photos, everything seems moveable, so let's take it apart
- they are so Bl%#@& simple, your 35 mm camera or digicam
is far more complicated than this baby!
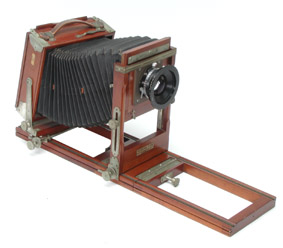
There are 2 types of view cameras, one is more suited for outside
work I feel,  nice and compact, folds up
in most cases, sometimes very nicely made in rosewood and brass.
<<--Classic/Landscape
View Camera
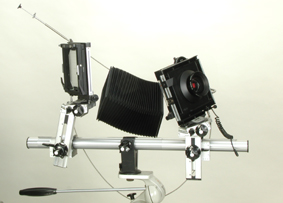
The other one is like a monorail or optical bench type and is
usually used in a studio environment. The look is more utilatarian without all the shiney brassy bits that could
stuff up your shots by causing reflections in the wrong spot....
Studio/Monorail -->>
View Camera
They both work on the same principles. The "landscape camera"
has less moving options, or is more limited in its movements and
you can only take it apart to change lenses. Since the classic/landscape
camera is so limited, let's examine the studio/monorail camera.
Since I own a Sinar, I will demonstrate with photos of my own
camera what the bits look like. The new camera is all black, which
makes it easier to see the detail.
· The Base - a rail on which the components move.
The base can be extended as long as you like, or it can also be
shortened.
· The Lens panel or holder - this holder holds the
lens and shutter ( in most cases the shutter is built inside the
lens, therefore allowing high synchronization speeds for flash
photography, as high as the highest shutter speed of the lens.
· The Image holder - This holder holds the "ground
glass" on which the image projected by the lens falls. This
holder also has the facility to pull back the "ground glass"
a little to insert the holder containing your film.
· The bellows - that harmonica shaped thing, that
connects the lens and image holder in such a way that no light
outside the camera can fall on the film (a little like a "flexible
camera body"). Theoretically, you could take a picture without
the bellows if you were in a total dark room, and the light on
your object was very directional and far enough away not to cause
any stray light to fall on your film - it's worth a try....
· Black cloth - a viewfinder with a mirror to view
the upside down image on the groundglass the correct way ( mostly
needed for art directors, as photographers can read upside down
images...)
Other items which go along with the view camera: a tripod of
the very big kind is a must; a lenshood is nice, and so is a host
of other things that will make life a lot easier.
More or less, this camera is the same as an SLR but without the
mirrors, and the shutter in the front and not in the back of the
camera. Ok, so these are the basic bits, now how do we make it
work?
The lens projects an image, and depending on the focal length,
it will produce a cicular image (your lens is circular, not oblong
or square). This image has to be focused to see it sharply on
the groundglass. Your ground glass will collect the center of
that projected image circle, and what can't fit on the groundglass
drops into oblivion. (Later, I wll tell you how to retrieve those
bits...).
You can focus in three ways (versatile don't you think?).
1. You move the lens panel forward or backward until the
image sharp.
2. You can move the imageholder with the ground glass
forward or backward until the image sharp.
3. You can do a combination of both 1 and 2.
If you move the lens panel forward and backward, you are actually
doing the same as you would, if you were getting closer or further
away from your object - this is not the best idea to start with,
because it will alter your image.
You know from your 35mm experience that in order to get very
close for macro work etc. you might have to buy extension tubes,
or a little extension bellows to bring the lens further from the
body to focus so close. The view camera does not need that, provided
your bellows are long enough and the rail to support your camera
is long enough. Your lens can move away from the image panel in
the back to get very close - diabolicaly close to the object of
your desires. And you don't need to buy anything extra...( bonus,
bonus!). On the contrary, if you do landscape work, or work on
"infinity," the lens and image panel will sit very close
to each other.
What I like about the image on the ground glass is the fact that
is viewable from a short distance. This gives the image-maker
the opportunity to "see" the composed image in 2D reality,
as on a printed photo or page. When you look through a 35 mm viewfinder,
you look "through" the viewfinder at reality in real
life, small and not in 2D! Not that this takes anything away from
your photo, but seeing your photo in detail from a little distance
is an unforgettable experience - the detail, the colors, the sharpness,
blah, blah, blah I love it!
Next month we will be going sideways and bending a few things.
Any enquiries, email me at hotshot@ihug.co.nz, or see me at www.AlbanyStudios.co.nz.
This article was first published in the Photographers Mail -
New Zealand - February 2001.
Lens With a View Series:
Article: 1
2
3
4
5
6
7&8
9
10
11
12

Robert van de
Voort is a professional photographer and writer, with his headquarters
located on the North Island of New Zealand. Robert's professional
photographic career spans the course of over 20 years, with work
in stock, advertising, studio, digital photography and much more!
You can learn more about Robert and see examples of his stunning
work by visiting his website at
www.AlbanyStudios.co.nz.
The staff at Profotos.com
would like to thank Robert for his generous article contributions,
and we would like to invite you to come back next month for the next issue of "A Lens with a View" series!


