| CONTACT US | FAQ'S | ||||||||||
 |
 |
 |
 |
 |
 |
 |
 |
 |
 |
|
|
|||||||||||||||||||||||||||||||||
|
|
|
|
|

|
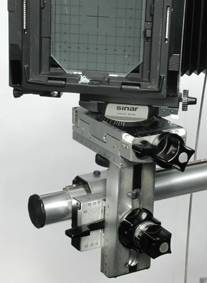
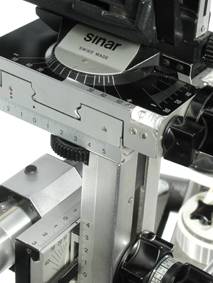
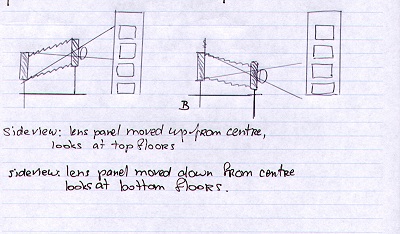
If the rest of the camera bits in the back (the image-panel) are also in 0 position it is exactly like your 35 mm camera, it shoots straight, the lens sits perfectly in the middle of the negative (or image-panel). The adjustments we can make with the lens are as follows: Right, lets go with the up and down movement (no not that one J…): If you move the lens once it is focussed, up from the center the following things happen: the lens projects an image circle (round lens remember?) on the back (image panel). The lens projects the image upside down onto the image panel's groundglass as your transparency projector does too. That projected circle moves down, showing on the negative more of the top of the image in front of the lens, say like a building. First you could only see the bottom three floors of the building. Now, after you moved the lens up, you can see floor no. 4 or 5 coming into view, but of course you loose floor 1 or 2 in the process. If you do the opposite, will you see more ground and less floors when you move the lens down? Yep. I have assumed that the camera is level, pointing straight ahead and only the lens panel is moved, the rest is in 0 position. This movement of the lens is very useful in architectural stuff, but so far, I have given you only half the story. There are a few more helpful adjustments that will make life very cool for an architectural photographer. [see diagram below]
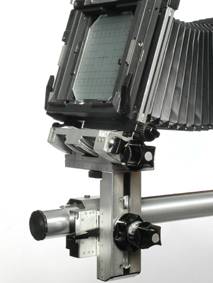
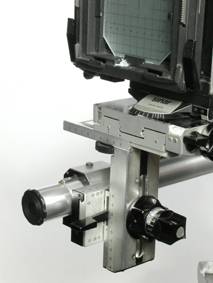
The movement to the left and right of the lens is a bit harder to grasp - why would you do it? Well, imagine you have to photograph a photo or painting for a catalogue, but it is nailed against the wall and there is this bloody pillar smack bang in the middle where your camera would have been. To take a photo of it without distortion (the painting/photo stays oblong or square), your camera position should be such that the lens is opposite the centre of the photo or painting. Ok, cool - no problem. Stand as close as possible to the pillar, with the camera at the same height as the center of the painting. The image-panel (in the back) is still in the 0 position, and the rail supporting the camera is horizontal. Now, when you look at your groundglass straight ahead, you can only see half of the painting because you are not directly in front of the middle of it. Now move the lens to the right or left (this depends where are you are next to the pillar!) and you will see more of the painting coming into your viewfinder until it all fits. Remember, not all other camera positions have moved from zero possie - only the lens shifted sideways. The side movement for myself, is a fine adjustment tool to get the elements in my photo which I want, and to exclude the non-essential bits. [see photo below]
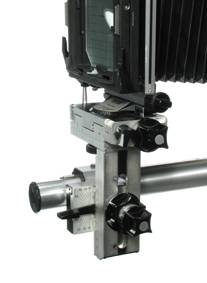
Aha, you guessed it, I am reversing the view camera as a slide projector (I do use that function as well to create complicated set ups). When you tilt the lens of the slide projector up, the projected image distorts on the wall. You will see that the top of the transparency is projected at the bottom on your wall and the bottom of your transparency is projected higher and wider on the wall, distorting the image in an exaggerated perspective. The opposite happens when you tilt the projector towards the floor…Now this is only half of the truth, because our scenery (the transparency) is still sitting parallel with the lens. More "distortion" would be visible if the lens would move on an angle away from the transparency, but I think that would break the projector. But the view camera can do this. The swing works similar to the tilt: Point your projector to the left or right instead of square onto the wall - I hope you get my drift [see photo's of the image-panel below, which are in the positions I mentioned]
Any enquiries, email me at hotshot@ihug.co.nz, or see me at www.AlbanyStudios.co.nz This article was first published in the Photographers Mail - New Zealand - March 2001. Article copyright Robert A F van de Voort 2001, can be reproduced unabridged with reference to author.
Lens With a View Series:
 Robert van de
Voort is a professional photographer and writer, with his headquarters
located on the North Island of New Zealand. Robert's professional
photographic career spans the course of over 20 years, with work
in stock, advertising, studio, digital photography and much more!
You can learn more about Robert and see examples of his stunning
work by visiting his website at www.AlbanyStudios.co.nz. Robert van de
Voort is a professional photographer and writer, with his headquarters
located on the North Island of New Zealand. Robert's professional
photographic career spans the course of over 20 years, with work
in stock, advertising, studio, digital photography and much more!
You can learn more about Robert and see examples of his stunning
work by visiting his website at www.AlbanyStudios.co.nz.
The staff at Profotos.com would like to thank Robert for his generous article contributions, and we would like to invite you to come back next month for part 3 of Robert's "A Lens with a View" series! |
||||||||||||||||||||
| Questions, Comments? Look
here: The
help section Broken link(s)? Email us at: Testimonials. Visitor/Member Comments: News about us! |
FREE SCHOOL INFO
Select "Photography" under
Program of Study to see
Photo Schools
|
|
|
|
profotos.com: HELP | ADVERTISING INFO | CONTACT US | SITE MAP | FAQ's | ABOUT US Copyright ©1999-2011 Profotos.com (an independently owned company). All rights reserved. Terms of Use and Privacy Policy and Safety Information are applicable to this site. Our Address: Profotos.com, 681 Inverness Drive, Fairborn, OH 45324 USA Contact us via telephone: 937-660-0845 |
 To explain the last two movements visually
- the swing and the tilt, let's get a slide projector out. Consider
the wall on which you project the image as your negative or image
holder. The transparency (I do not use the word slides, that is
not a professional expression but it means the same) is the scenery
in front of your lens; the lens sits in the middle.
To explain the last two movements visually
- the swing and the tilt, let's get a slide projector out. Consider
the wall on which you project the image as your negative or image
holder. The transparency (I do not use the word slides, that is
not a professional expression but it means the same) is the scenery
in front of your lens; the lens sits in the middle.